Second Republic to Empire Game

Questions, chat, feedback and developments relating to REPUBLIC TO EMPIRE... Wargaming the wars of Napoleon Bonaparte.
Captain Chook
Staff Sergeant
Staff Sergeant
Posts: 55
Joined: Fri Apr 09, 2010 8:38 pm

Second Republic to Empire Game

Post by Captain Chook » Mon May 03, 2010 9:34 am

VB and I played our second game of RtE on the weekend.

I will post a report in parts (to fit around my parental duties tonight).

An Anglo-Portuguese force, comprising a good number of veteran units, was occupying a series of defensive features in an attempt to halt a numerically larger but qualitatively inferior French force. Both commanders, General Sir Arthur Sandwich and Jean Bidet-Arras were Skilled, allowing a lot more scope for manoeuvres than our last game.
The game was played with 15mm figures.
Image

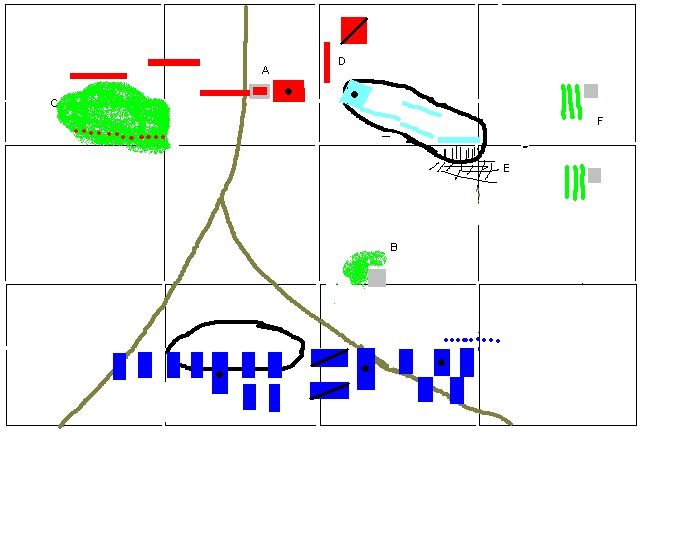
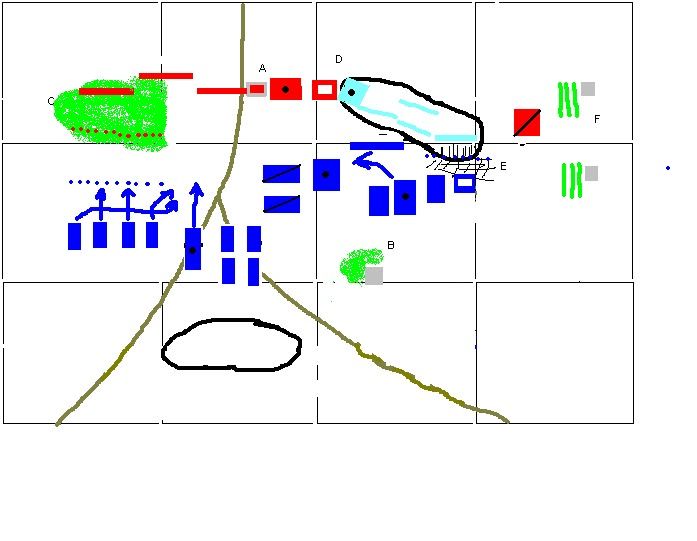
The aproximate dispositions are as above (a little inaccurate in places due to my inferior computing kills).
A: a Class B size 2 BUA – the church and walled graveyard of Santo Placido de Dingo. This can hold a garrison of 6 combat groups and can be assailed by a maximum of 20 combat groups at any one time.
B: a Class A size 1BUA – a small farmhouse. Can hold 3 combat groups (maximum 6 assailing combat groups). Surrounding this is a small copse of open woods (50% movement).
C: Open woods.
D: a medium height ridge with gentle slope except for the area behind broken ground (E). The slope here is steep 25% movement and impassable to artillery. The broken ground will count as soft cover and impede movement by 50% to infantry, 75% to other troops.
F: Vineyards and buildings.

Image

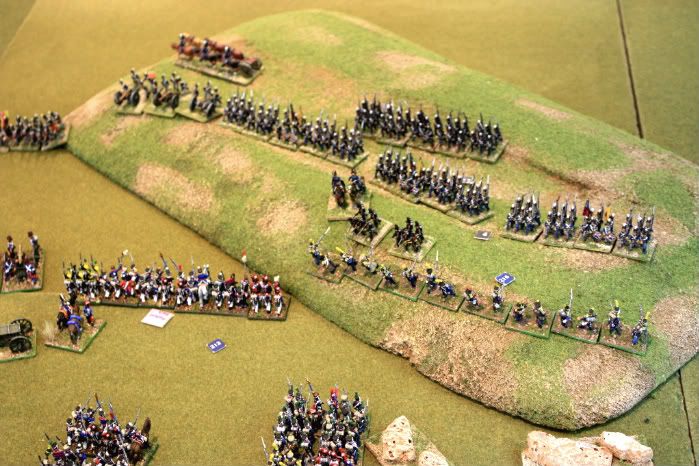
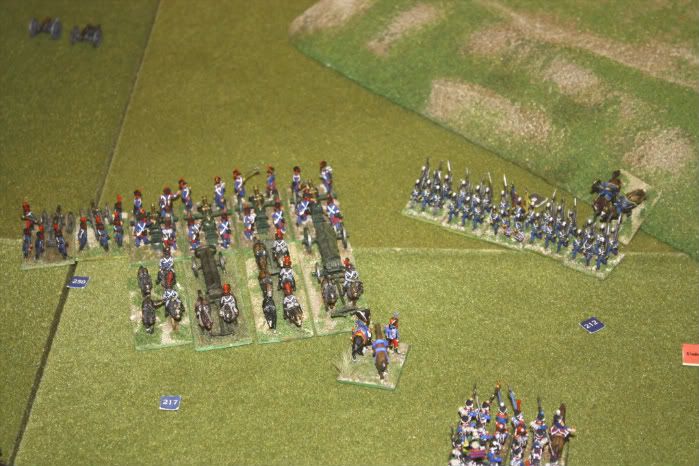
View of the British from the French lines
British OOB
Commander: Major General Sir Arthur Sandwich: Skillful (some of his troops might say "Arfa-Sandwich")
British Infantry Brigade - Seasoned
1x 40 Veteran Infantry
2x 40 Drilled Infantry
2x 30 Veteran Infantry
1x Veteran Battery (3 nine pounders)
Detachment of 95th Rifles : 20 troops (veteran). This will allow you 8 skirmish pairs and 1 combat group of formed troops.

Portuguese Brigade - Seasoned
3x 30 Drilled Infantry
1x 30 Recruits
1x Drilled Battery (3 six pounders).

Unbrigaded Cavalry (Unsure whether they need a rating yet. If so, they will be Inspired)
1x 18 Hussars - Veterans

Image

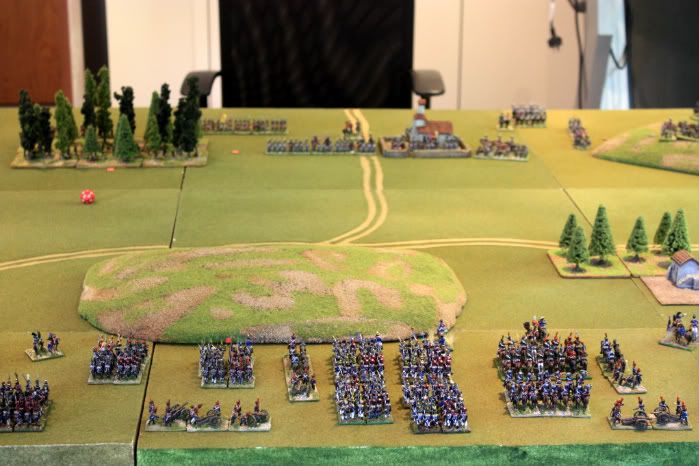
The British centre and Right (the detachmnt of 95th rifles are in the woods).

French OOB: General de Division Jean Bidet d'Aras: Skillful
1st Infantry Brigade - Inspired
2x 36 Veteran Legere
2x 36 Drilled Ligne
1x Drilled Battery (4 eight pounders)

2nd Infantry Brigade - Seasoned
1x 36 Drilled Legere
3x 36 Drilled Ligne
1x Drilled Battery (4 eight pounders)

3rd Infantry Brigade - Seasoned
2x 36 Drilled Ligne
2x 36 Recruit Ligne

Light Cavalry Brigade - Seasoned
16 Drilled Hussars (3rd Provisional Regiment - can therefore have all different uniforms)
16 Drilled Chasseurs a Cheval
1x Drilled Horse Artillery Battery (3 four pounders)

Image

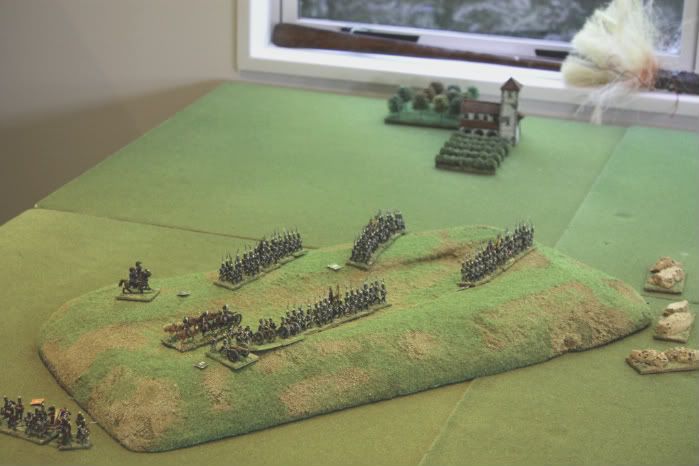
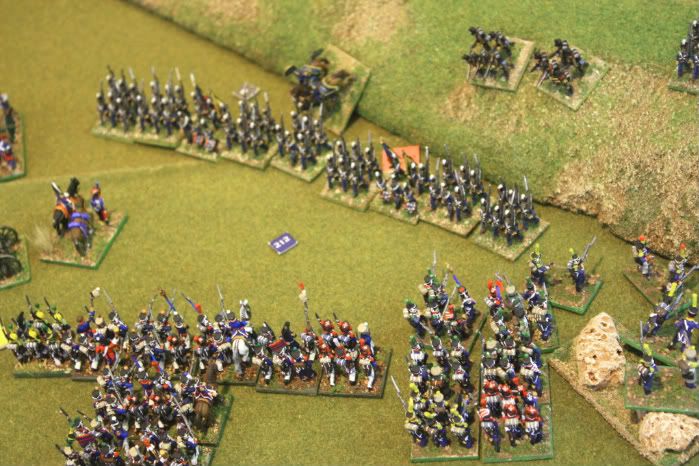
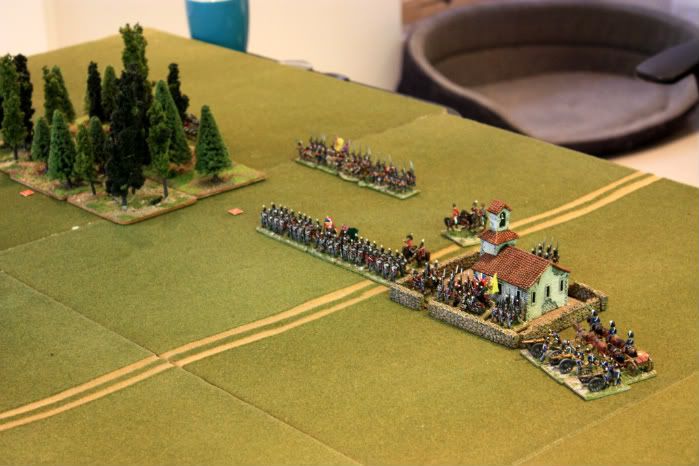
View of the ridge held by the Portuguese.

Part 2 to follow.....
Captain Chook
Staff Sergeant
Staff Sergeant
Posts: 55
Joined: Fri Apr 09, 2010 8:38 pm

Post by Captain Chook » Mon May 03, 2010 9:46 am

Part 2.
The combat started on the French right with the plan to hold the Portuguese where they were while using the battery and possibly later a battalion against the hinge between the Portuguese and British.

Image

Ultimately, this would lead to some sort of stalemate where the Portuguese would rout a French battalion through artillery fire and charges by two battalions against this weakened and wavering unit.

Image

Further French battalions were applying pressure here through effective skirmishing and a charge against one of the now disordered Potuguese units. Their battery had to pull back for refitting while the French battery fired at the nearest British unit.
User avatar
barr7430
Site Admin
Site Admin
Posts: 5905
Joined: Tue Jan 04, 2005 4:22 pm
Location: EK,Scotland
Contact:

Post by barr7430 » Mon May 03, 2010 10:23 am

What a lovely game 8)

I always think that 15mm looks beautiful when done properly (like this).
I will definitely put my money where my mouth is by photographig my own 15mm Naps in a game setting..

I chose to collect the 1812 Campaign in 15mm rather than 28mm.

Cap'n Chook.. would be useful to hear about any of the mechanisms from R2E that you found:

1. Useful
2. Realistic
3. Irksome
4. Unclear

Is there a Part 3?
"If you think you can, or if you think you can't, you are probably right"

Henry Ford
User avatar
obriendavid
General of the Army
General of the Army
Posts: 2627
Joined: Thu Jan 27, 2005 3:41 pm
Location: Scotland
Contact:

Post by obriendavid » Mon May 03, 2010 11:06 am

barr7430 wrote:What a lovely game 8)
I chose to collect the 1812 Campaign in 15mm rather than 28mm.
Which makes lots of sense as we had decided on doing Borodino in 28mm in 2012 :roll:

Nice looking game report though.
Cheers
Dave
Captain Chook
Staff Sergeant
Staff Sergeant
Posts: 55
Joined: Fri Apr 09, 2010 8:38 pm

Post by Captain Chook » Mon May 03, 2010 6:54 pm

Part 3.

While all this was happening the French infantry on the left and centre were steadily advancing.
The British remained relatively stationary other than their light cavalry regiment which, using multiple single unit moves (loads of points free with only 2 points needed to keep two brigades on Defend), moved rapidly behind the ridge and started to move towards the flank of the French. Unfortunately, being so far from the CinC this unit would not be able to subsequently change its Move orders and reverted to Defend and did nothing for the rest of the game (the only unit in charge distance of its position was in rough ground/cover while all other units were out of sight behind the ridge).

Learning from this and seeing a battery ahead with only infantry in column of march nearby the French Light Cavalry Brigade also used exploitation and multiple single unit moves to advance within charge range. The veteran infantry threw well and moved into square so the cavalry charged the battery.

Image

(Photograph shows Chasseurs starting their advance - rahr blurred, one can also just make out the head of the limbered Horse Artillery to their right) with veteran British battalions in the BUA and square with artillery between).

Normally I would not charge cavalry against artillery frontally, but the artillery had not yet fired and so the Chasseurs would be a new target and fast moving, quartering the number of dice rolled. Also, I wanted the artillery to be forced to repeatedly change targets, next moves the French would make several different threats in this area. As it was, one casualty was all that was needed, the second Resolve check to charge home failed.
However,, moving up with the cavalry was horse artillery which was now in front of the square. A blast at that led to the British battery and Portugeuese battery on the hill target my own battery. Again a new target, but enough fire to reduce me to two guns and fail a resolve check - retreat.

Part 4 to come.........
Coyote
Second Lieutenant
Second Lieutenant
Posts: 125
Joined: Tue Nov 11, 2008 6:31 pm
Location: Ottawa, Ontario, Canada
Contact:

Post by Coyote » Mon May 03, 2010 8:51 pm

Haven't read the whole post yet, will go back and do so.

But Toot-toot: http://www.battlegames.co.uk/documents/ ... reebie.pdf

There's an article on using a free program to make maps. The cool thing you you can make a library of your terrain and re-use them for new maps.
Tyler "Coyote" Provick
http://tyler.provick.ca
Coyote
Second Lieutenant
Second Lieutenant
Posts: 125
Joined: Tue Nov 11, 2008 6:31 pm
Location: Ottawa, Ontario, Canada
Contact:

Post by Coyote » Mon May 03, 2010 8:55 pm

Looks good. I agree with Barry about the 15s looking good. I think the earlier photographs show them off to best advantage.

Adding further wait to my crazy plan to wargame 10mm 1812 after I paint the planned ~600 28s for my Lundy's Lane scenario. See you in a few decades!
Tyler "Coyote" Provick
http://tyler.provick.ca
Captain Chook
Staff Sergeant
Staff Sergeant
Posts: 55
Joined: Fri Apr 09, 2010 8:38 pm

Post by Captain Chook » Wed May 05, 2010 8:59 am

Part 4.

The situation was now something like this:

Image

The brigades on the left and centre were pushing forward but as the CinC was still too far away they didn't use exploitation moves. Skirmishes were thrown out to counte the dreaded men in green occupying the woods.

The horse artillery were retreating and the chasseurs stayed put to reorder themselves rather than reforming back. At this stage, with a BUA to attack, I decided it was better for cavalry to be hit by artillery than infantry and hoped they would be a tempting target. Instead Valley Boy fired at the nearest French column causing it to waver despite few casualties.
Later the chasseur wer to again charge at the British battery resulting in a melee and a rout - more about this in a later post.

Back on the right a French foot battery had earlier been moved forward with the hope of being screened by the lead French battalion which had formed in line only to be mauled by artillery and charged by infantry see earlier post). Now, one Portuguese battalion was on the flank of the artillery, still within the charge range allowed for a unit with defend orders. The nearest formed French infantry support was blocked by the unit which had routed (see Part3).

Image

(the unit in rout stopped its move just before contacting the column behind - more about this later. I forgot o turn the figures around so they still face forward despite routing!).

The French battery was now on defend orders (the brigade had advance and had reached their destination and so reverted to defend). These orders state a unit may not fall back, so I elected to leave the battery in place and fire at the British battalion to their front causing that unit to rout as a result of the Resolve test. The Portuguese charged the battery.

Image

Battery retreated, but, does this mean they attempt to limber and retreat, do the men run ad leave the guns? We took it to mean that the men ran.

The end of the game (but not the battle) was now near as it was getting late.
The French left finally closed in on the British opposite them and artillery started to inflict growing casualties on the units supporting those oin the BUA (the idea being to strip supports and then focus on the garrison). Despite casualties, wavering, and in the case of one unit (which was partially in the woods and partially out) wavering and disordered the French columns failed to charge home! Although I now realise I forgot to apply the +1 for columns which had already moved forward this bound.

The game stopped here with now mounting pressure on the British centre and the Portuguese being held where they could offer no assistance. The Portuguese were also without their battery now refitting (for 3 turns) and so they risked later being pushed back (they had 3 units , one mauled by skirmishers, one Recruit battalion against two veteran and one drilled French battalions. The British did have a cavalry unit on defend on the flank of the Portuguese position and as French in all probability climbed the hill, they would then be in range of a cavalry charge within the conditions of a defend order. We decided this side of the field was a stalemate and things were uncertain in te centre although numbers were certainly against the British.

Analysis of some features of the game, commentary ad questions wil follow on my next posting.
Captain Chook
Staff Sergeant
Staff Sergeant
Posts: 55
Joined: Fri Apr 09, 2010 8:38 pm

Post by Captain Chook » Thu May 06, 2010 10:08 am

Sorry, things got drawn out at the end.
In making the scenario the idea was to have a game with some balance but having very different forces in terms of size, quality and perhaps mobility.
Originally there was to be a limit on the number of moves, forcing the French player (me) to start throwing troops against the BUA early. We soon realised that the size of the table would mean quite a few moves were needed just to get into combat range. Having no idea as to what was a reasonable game length we dispensed with this. This gave the French an advantage now where they could use superior numbers to strip the BUA of it supporting units.

All up the British had 324 infantry and 18 cavalry, the French 432 and 32 respectively. The French had 11 guns, the British 6 but 3 were veteran.
The British force had 154 veteran troops and 30 recruits, the French 72 veterans, 72 recruits.

In the battle each side lost 3 units if we include the foot battery charged by the Portuguese. In the last French charges we forgot to apply the +1 for a battalion in line moving forward, this would have resulted in one charge being successful against the unit half in/half out of the woods: 10 combat groups + d3 for veterans x0.5 waver, x 0.5 disordered = at best 4 dice vs 9 combat groups + charging on column of attack +5 =15 dice.

Compared to our previous rules, General de Brigade, skirmishing is far more effective and needs to be delt with properly. On the French right my skirmishers were particularly effective as they were allowed to occupy the broken ground. In GdB this would have been of little importance.
Artillery fire was more deadly than GdB but had to be used more carefully. We saw the Potuguese severely damage a French battalion, whereas the British battery, with its veteran gunners, did far less damage as they had a new target with each firing (cavalry, horse artillery, infantry, cavalry).
Despite the casualties inflicted by artillery, this in itself was not a game-winner and infantry were needed to exploit the effect of the guns - probably a very realistic outcome.

There were a few odd situations and we have some queries which I shall include in the next post.
User avatar
barr7430
Site Admin
Site Admin
Posts: 5905
Joined: Tue Jan 04, 2005 4:22 pm
Location: EK,Scotland
Contact:

Post by barr7430 » Thu May 06, 2010 10:22 am

Cap'n Chook.. great posts, thanks for sticking with the subject I know from experience that takes effort, time and focus. I am not a glory seeker or sychophant junkie so prefer the feedback straight and I see that you are a man who does that :D .
I am particularly interested in points related to how the game played and felt.. the skirmisher feedback is very interesting. I must thank Clarence for plaguing me incessantyl about skirmisher rules all the way through the writing and play testing period. I find that Light troops and skirmishers tend to do what they are supposed to.. which is good!

The weirdness situations... line 'em up and I'll see what I can contribute inthe way of clarification :D
"If you think you can, or if you think you can't, you are probably right"

Henry Ford
valleyboy
Command Sergeant Major
Posts: 106
Joined: Thu Dec 04, 2008 8:08 pm
Location: NZ

Post by valleyboy » Thu May 06, 2010 11:18 am

Shall I interject? - just to set the record straight, the Chook got a kick in the backside and is now nursing his wounds in a Parisien brothel...

.... (where I should add- he now works cleaning the toilets :lol: )

Ok I'll be serious...

We all bring preconceptions and hang ups/favourite bits/pet hates etc to a game that we've acquired over the years playing several rule sets. I really do enjoy RTE and see it as a the likely Napoleonic Holy Grail.... ie the rule set for very big games. It is difficult to leave behind those habits when you approach a game

At the moment we are slow, because we aren't familiar with the mechanics yet. This was essentially a divisional sized game where the Chook had 3 infantry brigades and a cavalry brigade engaging a static enemy force. Effectively what he did was issue orders to the effect of: -

Infantry Brigade A - "Advance and engage/neutralise/pin the Portuguese brigade on the hill"
Infantry Brigades B, C and Cavalry brigade - "Advance on the British brigade to your front including that part in the BUA" - intending to convert this into an "Attack the British brigade and BUA" at the opportune moment (ie once your artillery has duffed them up a bit)

The problem was that the B,C and cavalry were advancing over a gaming area of 4' so when the time came to change Advance into Attack it would be difficult to get the Divisional Commander to activate the 3 brigades (even with enough points - the brigade commanders are widely separated by distance) - our understanding is that he is the only one that can change the brigade order and he has to be close to the individual brigade commanders to do this.

From the British perspective, not knowing what was being intended and wondering if French Brigade A was trying to flank my Portuguese on the hill - I sent my hussars around my left flank to give the attacking French something to think about and slow them down allowing my artillery to play. This worked to some extent but I sent them too far - they ended up being about 4' from my C in C - I sent them with a Move to the left flank order (they then on arrival default to defend) - subsequently the only way i can get them to do anything is move my C in C 4' away from the centre of battle and change their orders ( I should have been wiser in the allocation of my inital order I know) I wasn't going to do this.

Maybe this is very realistic as the C in C cannot be everywhere on the battlefield. The problem I see in a divisional sized game is that if a great gaping hoole opens up on the enemy left flank, a brigade commander unless he is close to his C in C cannot seize the opportunity and take advantage of this by hurling his Brigade forward at the - (what if the divisional commander is on the rt centre?)

Caveat - I may have misunderstood the rules completely :oops:
In a Corps level game presumably a divisional commander seeing a - could exploit this if he had sufficient MPs - if the Corps comander was close by he could also benefit from the corps commander's fixed MP allowance
I'll have a red face and so will Chook if you say that Brigade commanders can change their own brigade orders (with or without borrowing the the CinC/Divisional commander's fixed MP in this case)

I hope I'm not as clear as mud :roll:

(PS Barry I think that g a p i n g h o l e ) might be a swearword to your filter!
Captain Chook
Staff Sergeant
Staff Sergeant
Posts: 55
Joined: Fri Apr 09, 2010 8:38 pm

Post by Captain Chook » Fri May 07, 2010 9:29 am

Ah, VB has pre-empted my final post.
Yes, I agree the distance to travel across was too far, especially as only one force was doing most of the moving.
As you will see for my post about playing with 15/18mm scale, simply converting all distances straight to cm on a 1:1 basis has some problems as the footprints of the units are not 40% that of 28mm figures but closer to 60%. This would still make for a minimal difference in the movement rate and the fault of the slow game was all mine as I designed the scenario.

Command and Control
This is what we believe to be the case: Single unit actions are based on distance from the brigade (commander). A change in brigade orders comes from the CinC who must be within range - there is no possibility of paying double the points if outside this range. We therefore also assumed that exploitation by a brigade is at the instigation of the CinC and so must, again, be in range.

Charges/Melees
In the game we had two cavalry charges, one was successful; six infantry charges, three successful, but if we read the rules properly a fourth would have gone through. Here success means the charging unit actually goes through with the charge, contact might not necessarily be made as the target may retreat.
Overall melee is simple enough. The combat we felt was unusual was the French chasseurs (drilled, 4 combat groups) vs the British battery (veteran, 3 combat groups). Cavalry got a bad roll and so the difference in combat was only 2, a draw. Next round, cavalry lose their charge bonus and as light cavalry lose two dice. The artillery, as veterans maintain their +d3 and so actually had more dice than the cavalry. Again a draw but artillery down to 50%. As veterans they pass resolve, a final bound of combat. Now both forces (after another draw) are at 50% and BOTH units rout after failing their resolve.
We struck something similar in our first game with light cavalry combat. After losing the charge bonus, having -2 dice and being at 50% for disordered so few dice are thrown that a draw is inevitable so comabt grinds on over several bounds until one side is at 50%. This seems overly bloody for light cavalry combat. It also seems odd that light cavalry against infantry suddenly become disadvantaged in a second bound of combat.
We also found that charging units are often out of support range of their brigade and end up suffering in subsequent Resolve rolls.
Cavalry have a long reach in a charge, yet the Brigadier, if not attached, has a much shorter move and can easily be left behind and so another negative on the resolve test.
Now, these last problems may just call for better management of units, but the light cavalry combat problems don't feel right.

Skirmishing
Best skirmishing rules I have come across. A balance is achieved preventing them being too powerful or irrelevant. Here they are enough of a nuisance to be delt with slowly adding to casualties and wearing down the enemy. Chosing the terrain for skirmishers is important. VB forgot for one move that line units could deploy skirmishers. In that time I had taken the rough ground which we had made cover (-2 to enemy firing) - enough with my greater numbers (a light battalion in half deployment) to gain dominance and lter fire on the parent unit in line.

One more post to come as I am needed elsewhere. Commentary to continue....... :lol:
Captain Chook
Staff Sergeant
Staff Sergeant
Posts: 55
Joined: Fri Apr 09, 2010 8:38 pm

Post by Captain Chook » Fri May 07, 2010 10:40 am

More on Charges
I was a little perplexed as to why there were no positive modifiers for Resolve when charging enemy who are wavering or disordered, although on reflection I suppose this is because the ability to charge depends on ones own morale and judging what the enemy's state of morale is in combat may be difficult. Still it did, and to some degree still does, seem strange.

As an aside, can a unit be both wavering and disordered - suffering two 50% penalties? We assumed this to be the case.

Artillery
The idea of reducing the number of rounds artillery can fire before refitting is interesting and I think we both like this. I am still uncertain as to whether artillery batteries really did fall back and would like to know the evidence for this as this has been a feature of combat I had been unaware of.

Terrain
I had made a post regarding terrain. The main issue is to do with firing. If in, for example, a wood, a unit is disordered and so fires at 50%. An enemy firing INTO the wood gets only -2. We took this to mean only if the unit in the woods had not spent a turn not moving. Ifstaying in defence ofthe wood, firing is at full effect. Is this how you play it?
If a unit is half in and half out of the woods but has been stationary for a turn, would it be disordered if charged/in melee (despite the assumption made for firing we thought this didn't apply to combat). Below are two units in line, the Highlanders have been advancing half in and half out of the woods. Not shown is the unit which subsequently attempted to charge (photo taken as we were packing up).

Image

Artillery Charged
Artillery with Defend ordes is not allowed to withdraw from combat. But what if it is threatened from the flank. I can understand the restriction to being attacked head on, but from the flank artillery has no defense and almost certainly would pull back in this case. See picture below with Portuguese infantry on the flank of a foot battery and remnants of the horse artillery beyond that.

Image

Typo??
I wonder whether there i a typo on the Resolve Modifier Chart. There is a -1 for 25% casualties, then a -2 for 26-50% casualties. Few units will have EXACTLY 25% casualties so will go from a theoretical 24% casualties with no modifier to 26% with -2

Lotsa Dice
I had sworn never to play games with handfuls of dice. However, it generally seems to work here. Unfortunately one of my failings is a lack of patience and I do find it a little annoying to have to make up to eight different dice rolls to decide whether a charge goes in (Attacker resolve, defender resolve, defender firing range, defenders bonus dice if veteran, firing, attackers resolve, defenders resolve (fight or flight).

Finally. Although I was carrying the baggage of other rules sets which made it hard to get my head around some rules, generally the game played well. My main gripes would be the light cavalry combat and the "lotsa dice" when charging. At the time of the game I told VB I wasn't so sure about these rules, but looking back now I realise I had a lot of fun and didn't come away feeling tired and deflated as I so often do after a game. So, I guess this means we seem to enjoy these rules and will certainly be trying out more games.

Again, for those who are in New Zealand, please come to NICON so we can show off these rules (and perhaps enjoy some good wine and food after :lol: ).
User avatar
quindia
General
General
Posts: 1259
Joined: Tue Jan 18, 2005 4:51 am
Location: Chesapeake, VA USA
Contact:

Post by quindia » Fri May 07, 2010 10:50 am

I use the rules for couriers on page 46 even in 1-on-1 games. There may then be a delay in launching an order change, but presumably your opponent will be scrambling to order up the reserves/shift forces/etc. and may also be encountering the same problem! Depending on the size of the table/the location of your C-in-C/etc. it may be fast to have the big man gallop across the board, but if he's need in two places at once you have choices to make.

Typo??
I wonder whether there i a typo on the Resolve Modifier Chart. There is a -1 for 25% casualties, then a -2 for 26-50% casualties. Few units will have EXACTLY 25% casualties so will go from a theoretical 24% casualties with no modifier to 26% with -2


No, but I'll let Barry explain... :wink:
Captain Chook
Staff Sergeant
Staff Sergeant
Posts: 55
Joined: Fri Apr 09, 2010 8:38 pm

Post by Captain Chook » Fri May 07, 2010 7:48 pm

I see I made a Typo there!

Two last things I forgot.
Rout
When unit A routs I relise that it will disorder unit B behind it if it moves through B.
What happens if the rout doesn't quite make it to B but stops just short so that B really has no chance to move out of the way on the subsequent move? In GdB the routing unit, A, would by now be a mob that would move around and through gaps between units. To me this seems right as columns were often placed a suitable distance behind lines (at least in the French army) to provide support or to move up and take the place of a defeated friendly battalion.
I have also just started Volume III of Thunder on the Danube. Here there is comment on a line opening up and (the implication is in good order) allowing a routing friendly battalion to pass through.

Column of Companies/March to Line
In our first game we didn't really grasp all the implications of how order changes worked. I thought we would really test the system by having a very mobile French army (skilled general and seasoned brigades) vs a plodding Austrian with sluggish brigades. Having only a couple of brigades each this resulted in the Austrians nearly always having no extra MPs after issuing orders.
Now, we had the idea to cme on the table as an "encounter" game and both forces were in column of companies.
Austrian Brigade A was coming on table from near one edge and was trying to link with Austrian Brigade B. This led to it marching parallel to the table base. Upon being threatened by French infantry the orders went from Move to Defend (4MPs). No points were free to change to line , even though this would have been a simple matter one would have thought for this formation. Next round saw poor dice rolls and again they couldn't turn to line. This manoeuvre of going from a column of companies or even a march column to line without having to change the overall orientation of the individual battalions was a basic part of Frederican tactics. In tis one instance the rules seemed to present an unrealistic result. We allowed the Austrians to finally turn, mainly so we could fight a combat to test out that part of the rules.
Possibly the answer is don't be so quick to rate a general as a plodder and don't have more than one sluggish brigade in a small game.

Thanks. I think this now covers all our questions. Once again, despite my initial misgivings, I have enjoyed these rules. They are nice to look at and generally easy to read. When the next edition goes to print some cross referencing would be helpful, particularly on the quick check fold-out.
Post Reply